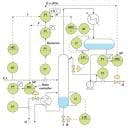
In our February 2007 issue, we looked at how to apply level measurement by considering the application. (“First the Application, Then the Product,”). We talked about a level measurement continuum, and handed out a nifty PDF that you can post on your wall to help you sort out the selection process (See Figure 1).
Now I want to talk about the level product that “dares not speak its name.” It is the level measurement product of last resort—the one you take to your boss after every other one has failed. It’s…nuclear.
Nuclear level gauges will work in nearly any level measurement application. You can see that from the chart below. But nobody uses them for the simple and easy applications. Why? Because they’re relatively expensive, and they’re truly a pain in the posterior because of regulation. On the other hand, they actually work in applications where nothing else does, and they require little or no maintenance.
There are some common (for difficult level applications, anyway) applications that only nuclear level gauges will handle. These include agitated tanks with internals, some interface measurements, moving or vibrating granulars, very hot or cryogenic liquids and thick-walled vessels.
When Nuclear is an Option
When few devices will work with your application or there is no other way to make the measurement, nuclear may be the choice.
How can you tell if your application is a “nuclear level gauge or nothing” problem? First, if you’ve tried differential pressure, bubblers, capacitance or rf admittance, ultrasonic or radar, and they didn’t work, or they were too high a maintenance headache, you might be a candidate for using a nuclear gauge.
If you can’t stick a sensor inside the vessel at all, you’re probably looking at using a nuclear gauge. If you can’t pick the vessel up and weigh it, you are probably looking at using a nuclear gauge.
If you have a reactor under very high pressure and temperature with a coolant jacket, a couple of inches of insulation, lagging, and an agitator and other internals, you almost certainly are looking at a nuclear gauge application. (See Figure 2).
But how do you know that a nuclear gauge will work? It’s actually much easier to determine success with a nuclear guage than with ultrasonics or radar. The math is simple and clear. You add up all the half-values of all the material between the source and the inside vessel wall, and all of the half-values of the material between the opposite wall and the detector.
Reactor Under Pressure
For a reactor under very high pressure and temperature, with a coolant jacket, a couple of inches of insulation, lagging and an agitator, a nuclear gauge is the answer.
Basically, an inch of steel is one half-value, and you can calculate the half values of different materials using their thickness and density. Most suppliers will do this for you and have computerized source-sizing programs with which to do it. Knowing the half values and the distance from the source to the detector enables the sizing program to calculate the size of source and source holder required to both make the measurement, and even more important, do it legally. The physics of the measurement are well-known, and once a source and detector assembly have been sized, it is a near certainty that the application will work.
Some of the things that will interfere with the application’s working include buildup of material on the inside or outside wall of the vessel. Sometimes you may need to locate the source and detector on a chord of the diameter of the vessel in order to miss an agitator or some other internal structures in the tank. This can radically increase the apparent thickness of the steel wall in a curved tank and may make the measurement difficult or impossible. Rapid fluctuation of level in the vessel can also cause significant error.
Make sure you know what all the layers are. If you miss just a half-inch of steel on both sides of the vessel, you might not have enough radiation at the detector to make an accurate measurement.
Yes, you have to have the device licensed by some regulatory agency. Somebody from your plant should take a radiation safety course and be licensed to test, move and store sources. Most suppliers provide this as a fee-based service, so it isn’t strictly required. And finally, you can’t throw the device away when you’re done with it. You must dispose of the source legally.
How Nuclear Level Gauges Work
Nuclear gauges work on one of two principles: gamma transmission or neutron backscatter. Most level applications use gamma transmission.
In a gamma nuclear gauge, a heavily shielded source holder is mounted on a source of gamma radiation (either Cs137 or Co60) behind a shutter. When the shutter is opened, the holder emits an aimed beam of gamma radiation through the vessel to a detector and electronics mounted on the opposite side of the vessel (See Figure S1).
Gamma Transmission Measurement
Everything between the source and the detector attenuates the radiation beam. For example, one inch of steel reduces the intensity of the beam by 50%, or one “half-value,” whether the instrument is a point level gauge or a continuous level gauge. Either one is calibrated by determining the level of radiation when the vessel is empty. This level, automatically corrected for source decay, is not likely to change unless the geometry of the vessel changes. This becomes the zero level measurement.
As the level in the vessel rises, the intensity of the beam is further attenuated by the amount of level present in the beam. In the case of a point level measurement, the beam is very narrow and horizontal, so that it provides a single point trip when the rising or falling level reaches the centerline of the gamma beam (Figure S2).
Point Level Operation
Flexible Detection
Neutron Backscatter Gauge
Point level detection uses a focused beam of radiation directed at a small detector.
Curved fiber-optics scintillator detectors make calibrating measurement easier in round tanks
These gauges are used for very short spans and point level measurement.
In a continuous level application, the gamma beam has a triangular conic section that produces a nonlinear output that must be linearized in the electronics. The linearized “percent attenuation” is inversely proportional to “percent level.” At zero level, the intensity of the radiation received at the detector is maximum, while at maximum level, the intensity of the radiation is minimum.
Some suppliers produce detectors that are flexible (Figure S3), and can be molded to conform to vessel shape in the case of round or other oddly shaped vessel geometries. This method requires less linearization than the straight detector tube and makes installation in tight spaces easier.
Some suppliers use source holders that are designed to hold multiple sources in a strip that is as long as the detector on the other side of the vessel. This is another way to reduce the amount of calibration error due to linearization, and minimize the size of the gamma source.
The other method of measuring level with nuclear gauges is neutron backscatter (See Figure S4). Because of its cost, this method is primarily used for measuring very short spans and point level measurements. In this method, a neutron source is beamed into the vessel (typical application, level in petroleum cokers). The interaction of the neutrons and the hydrogen atoms present in the vessel cause some neutrons at vastly lowered energy state (thermal neutrons) to be scattered. The ones that are scattered back (hence the name neutron backscatter) to the detector are counted. As the level rises, the amount of hydrogen rises, and the number of backscattered thermal neutrons rises, producing a level measurement.

Leaders relevant to this article:
