H.R.Ownath Jr.
[email protected]
A: No, it is not right. Let me explain why.
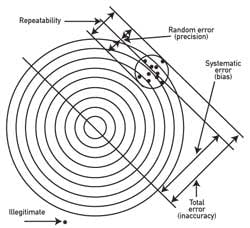
Figure 1: Illustration of the various accuracy-related terms
A - Reference error (eRef) is also called precision or random error
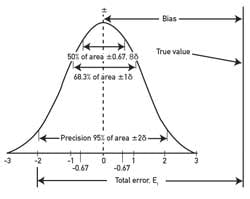
All measurement errors have two components. For example, in Figure 1A you see a target that was used for target shooting. Here the random error, which is also called reference error (eRef), is small because the bullet holes are close, indicating that the shooter was good. The total error of this target shooting example (or of your d/p sensor) is Et = eRef + bias. In the case of target shooting, the bias could have been caused by wind, faulty adjustment of the sights, or a number of other factors.Your vendor did not mention the bias of your d/p cell. Nor did he mention that the eRef he gave is in percent full scale, so at 50% reading eRef is ±0.4% and at 25% reading, it is ±0.8% of the actual reading. Lastly, he did not mention calibration dispersion (σ), so we do not know the results of the testing the cell went through (Figure 1B). Therefore, eRef = ±0.2% only means that at 100% reading and zero dispersion the error caused only by hysteresis, nonlinearity and repeatability (and nothing else!) will be ± 0.2% FS.
Figure 1: Illustration of the various accuracy-related terms
B - Total error (Et) is the sum of eRef and bias, also called systematic error
In your case, the temperature and pressure differences between calibration and operating conditions are 50 °F and 1000 psig. Your selection of URL = 750 in. H2O and URV = 100 in. H2O are unfortunate as they are very far apart. The errors caused by these factors can be approximated as follows:eTzero = ± 0.5 (URL/URV = 750 in. H2O /100 in. H2O) (50 °F/100 °F) = ±1.875% FS;
eTspan = ± 0.5 (50°F/100°F) = ± 0.25% AR;
ePzero = ± 0.25 (1000 psig/2000 psig) (750"H2O /100"H2O) = ± 0.9375% FS;
ePspan = ±0.5 (1000 psig/2000 psig) = ± 0.25% AR;
eRef = ± 0.2% FS
Using the Root Sum Square (RSS) method to calculate the combined error Et, at 100% reading total error will be:
This error was calculated for the condition when your d/p cell measures 100 in. H2O (100% of full scale, because at 100%, %AR = %FS). On the other hand, if you are operating at 50% FS, the error will double, and if your d/p signal is generated by a nonlinear element, such as an orifice plate, it will be even worse.
Please note that %AR is the percent of the actual reading, while %FS is the percent of the URV of the sensor (URV = FS). Also, URL is the upper range limit (the maximum value that the sensor is able to detect), while URV is the upper range value (the maximum value the sensor is adjusted to detect).
In addition, note that the Et calculated here is only the error of the d/p cell, while there might also be other error sources in the loop (orifice plate, square root extractor, I/P converter, etc.) that will further increase the error.
Therefore, it is desirable to calibrate all transmitters at operating conditions, and select a d/p having an URL of not more than twice the URV (FS) you are going to use it for. Another approach is to use more than one cell or multiple range d/p cells with range switching implemented by DCS or use "smart" transmitters that are capable of compensating for operating pressure and temperature variations.
Béla Lipták
[email protected]
A: I would point out that the end user can reduce these uncertainities at a relatively low cost.
Temperature: Install an insulated enclosure to reduce the effects of temperature, and temperature control the box to almost eliminate them. Calibrate at the controlled temperature.
Static pressure: Calibrate the transmitter at the operating pressure. Or at least do a final zero set under pressure.
Reducing the remaining uncertainties are a matter of comparing the value of the measurement versus the cost.
Cullen Langford PE
[email protected]
M.ULAGANATHAN
[email protected]
A: The difference between a three-way and a five-way manifold is only that two more valves are added to serve safe venting. Go though the link at www.pci-instruments-catalogue.co.uk/access/manifold.pdf for further information.
H S Gambhir
[email protected]
A: Five-way manifolds are used to pipe away the vents if handling toxic material, such as benzene, toluene, ethylbenzene and xylene (BTEX), shown in E or V in Figure 2 (above). Alternatively, V in Figure 2 offers an ability to refill glycol pots, and to calibrate the transmitter without accessing the rest of the connections.
Having said this, most folks don't use them in applications other than toxic service; they rely on the vent/purge connections on the transmitter for access. There are manifolds that provide double block/bleed isolation of the equalizing connection for custody transfer. However, I have never used them.
Ian H.Gibson
[email protected]


