For decades, I've advocated the adoption of an international standard to define a uniform basis for stating measurement accuracy on sales literature. This sounds like an obvious need, yet during the past half century—while repeating the need in five editions of my handbook—it hasn't materialized.
In this column, I'll first define the terms used in our everyday "accuracy-related" language. Then I'll explain the need for including calibration and rangeability in all accuracy statements, and conclude by suggesting a more meaningful format for accuracy statements.
Accuracy terminology
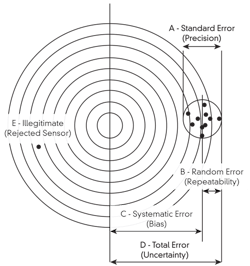
Let’s use archery to explain some of the terms used to describe measurement accuracy. In Figure 1, we see an example with most of the arrows are in a tight pattern, but away from the center of the target. What does this tell us? It tells us the shooter was a good one, but had some interference, such as wind, affecting his performance. Now assume the arrow penetrations represent measurement results of reading the same value by different sensors. How should we state the accuracy of this group of sensors? Well, we would measure the percentages represented by dimensions A, B, C and D, where:
Figure 1: Accuracy-related terminology can be understood as analogous to archery, where the bulls-eye represents the exact value of the process variable and arrow penetrations represent sensor readings.
A is the diameter of the spread and is referred to as Standard Error, Precision or Dispersion of that group of sensors. The larger the number of devices being tested, the larger this diameter, and the higher the percentage of test results that would fall inside it. Therefore, we usually state the standard error on the basis of the percentage of the measurements falling inside the circle (50%, 68.3% or 95%). Naturally, the higher this percentage, the lower he average accuracy. Therefore, stating the value of A without stating that only 50% of the devices meet the corresponding accuracy is misleading. The percentage value is Probability, and the lower its value, the less reliable the average sensor in the group is likely to be. In process control, we expect that the publisher’s standard error is 95% or better, but without it being stated, we do not know.
B: This radius is called Random Error, Repeatability or Reference Accuracy. This being the smallest number, some sales literature only state this one. If the purpose of the measurement is only to maintain the process at the same conditions as it was previously, then such a repeatable (but inaccurate) measurement is sufficient, but only then.
C: This distance is called Systematic Error or Bias, often caused by zero shift. Systematic error can often be eliminated by re-calibration or re-zeroing.
D: This distance in called Total Error, Total Accuracy or Total Uncertainty. If the goal of the measurement is to determine the true value of a variable because the information serves accounting or quality control purposes, a repeatable measurement (minimizing B) is insufficient, and this total accuracy must be minimized. This can be done by first calibrating the sensor under actual operating conditions, then making sure that the detector is properly installed and maintained.
Sensor E is not considered in evaluating the average accuracy of the group of sensors, but is reflected by the Probability Percentage, which states if 50%, 68.3% or 95% of the tested sensors met the stated average accuracy.
Calibration must be quantified
The specifications of all sensors should state if the device is calibrated or not, and if it is, how is it calibrated? The levels of calibration include:
C1: Full calibration, meaning that the sensor is individually calibrated under actual operating pressure and temperature conditions, and at normal load. In this case, the actual process fluid (not only water or air) is used for the test. One might note that in case of large flowmeters, this is seldom done, because of the limited availability of testing facilities for large flows.
C2: Individual sensor calibration, but using water or air under test (not actual operating) conditions.
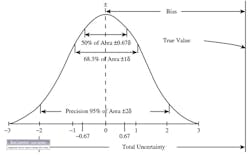
C3: Group testing, where the performance of a large number of sensors are evaluated at once. In this category, the probability of a particular sensor meeting the reported average performance (50%, 68.3% or 95%) should also be stated (Figure 2).
Figure 2: In C3-type group testing, the true value of the variable is at the center, the horizontal coordinate of the bell curve is in percent error, and the vertical is probability. Therefore, as accuracy (precision) rises, the probability that a sensor will meet it drops. The total uncertainty (maximum error) is the sum of the random and systematic errors (repeatability and bias), and σ is the standard deviation that indicates probability (dispersion).
C4: Partial calibration, when only the electronics of the sensor are tested. This could be the case with large, uncalibrated magnetic flowmeters, where the electronics are tested using a simulator to introduce a millivolt signal representing the meter output, without being generated by the meter.
C5: Uncalibrated devices.
Loop accuracy requires rangeability
Control loops consist of several components, and therefore the total loop error must reflect all error contributions. This total loop error is estimated as being the square root of the sum of the squares of the individual errors. When this loop error is calculated, it's correct only for that particular load (percent of reading) at which it was calculated. Therefore, if the load (percent measurement) drops, the same error can become a larger percentage of the actual reading (AR), linearly or exponentially, and this is where rangeability enters the picture.
Rangeability is the ratio of the limits of that operating region within which the particular accuracy statement holds. An accuracy statement can be based on (be a percentage of) the actual reading (AR), the full-scale reading (FS), and the upper range value (URV) of a sensor. If the accuracy statement is valid between 10% and 100% of the full-scale reading (load), then the sensor has a 10:1 rangeability. So what happens, if the accuracy statement is in %FS or %URV? Obviously, the error rises as the load drops, but how much?
Assume that pressure drop is being measured with a differential pressure (DP) cell having an accuracy of 0.1% URV, and that URV is 500 in.H2O. Assume that the span of the DP cell is set at 0-100 in.H2O. Therefore at 100 in.H2O, the 0.1% URV error is equal to 0.5% FS error (0.5 in.H2O). So, what is the error when measuring a 10% reading—in other words, what percentage of the actual reading is the error when the pressure difference is 10 in.H2O? Obviously it's 5%, and therefore the 0.1% URV sensor is 5.0% accurate at the bottom of a 10:1 range.
This example illustrates the importance of clearly stating the basis (AR, FS or URV) of accuracy statements in the sales literature. Naturally, if the process variable of interest is not pressure drop but flow through an orifice, since pressure drop depends on the square of flow, then the error in terms of flow would be 25% AR.
Rangeability of any sensor can be calculated by determining the minimum reading at which the accuracy statement is still met. For example, if the error can't exceed 0.5% AR, one can calculate the rangeability that a %FS or a %URV sensor of a particular accuracy will provide. One can illustrate this using the previous example, where the accuracy of the DP cell was 0.1% URV, and we can determine its rangeability in an application where the accuracy requirement is 0.5% AR. In the previous example, the quantity 0.1% URV equaled 0.5% FS, and therefore that sensor can meet the 0.5% AR accuracy requirement only at full scale (100%). Consequently, its rangeability is zero.
If the accuracy of the DP cell was 0.1% FS, the 0.5% AR requirement will be satisfied down to 20% (rangeability of 5:1). So we can see that it's not enough for the sales brochure to say that a sensor is 0.1% accurate; that brochure must also state "of what" that 0.1% is.
In case of an orifice-based flow measurement, the rangeability of the 0.1% URV cell would stay at zero, and the rangeability of the 0.1% FS cell would drop to the square root of 5 (~ 2.2:1).
Most major instrument manufacturers are fully aware of all this and provide us, the users, with enough information to select the right sensors for our applications. Yet, there still are fast-talking salespeople who will just claim 0.1% accuracy, period, and there are users who will accept such talk. For this reason it's desirable to establish international requirements on the information to be provided in sales literature when giving accuracy statements. These requirements should include stating the basis of the given percentage, the rangeability over which it is guaranteed to hold, and the calibration testing that was performed to support these values.
About the Author
Béla Lipták
Columnist and Control Consultant
Béla Lipták is an automation and safety consultant and editor of the Instrument and Automation Engineers’ Handbook (IAEH).


